To capture your screen and audio on a Mac, use the built-in Screenshot toolbar (Shift-Command-5) and select a microphone under 'Options' for voice narration. To record internal system audio (app sounds) as well, you must use either a virtual audio driver like BlackHole or a dedicated third-party app.
Why is Capturing Mac Audio So Complicated?
The core challenge is that macOS, for privacy and security reasons, does not provide a direct internal channel for one application to record the audio output of another. This design prevents malicious software from eavesdropping on your other apps. Consequently, built-in tools like QuickTime Player and the Screenshot toolbar can easily capture your microphone's input (your voice) but cannot natively record the sounds coming from your computer itself—like a YouTube video, a game, or a notification chime.
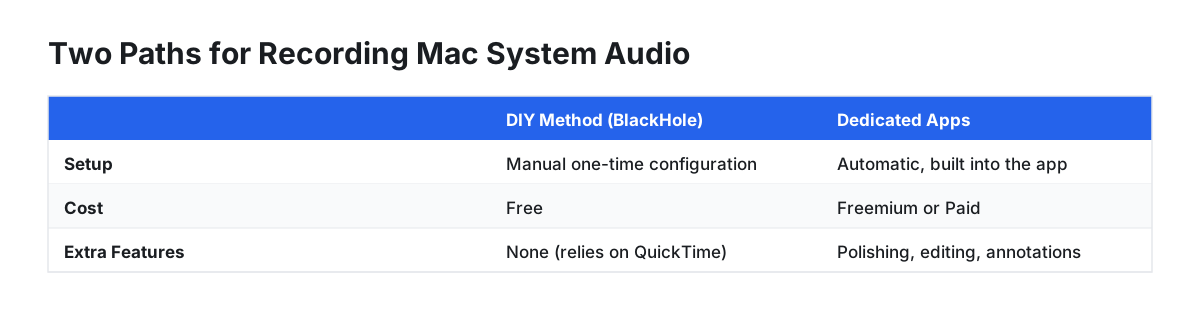
To solve this, you need a workaround. There are two primary paths:
- The DIY (Free) Method: Install a free virtual audio driver that creates a software-based bridge to reroute your Mac's sound, making it selectable as an input source.
- The App-Based Method: Use a dedicated screen recording application that has its own audio driver built-in, handling all the complex routing automatically.
Method 1: The Free Way to Record Internal Audio (BlackHole Guide)
For those who want to use QuickTime Player to capture sounds from applications without buying software, the solution is a free, open-source virtual audio driver called BlackHole. It requires a one-time setup, but once configured, it's a powerful and cost-free way to record your Mac's internal audio.
Here’s the complete step-by-step process:
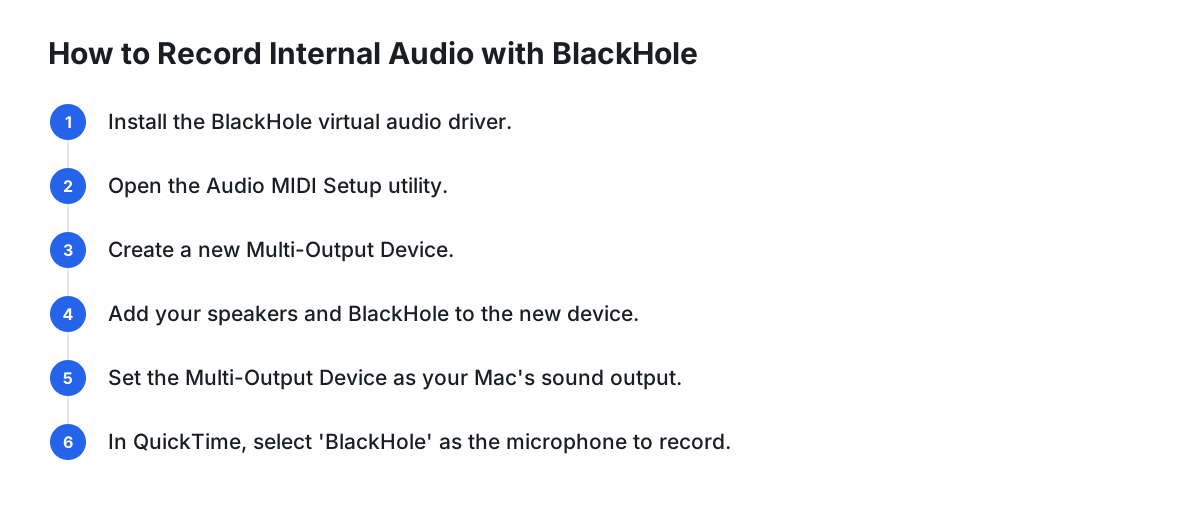
Install BlackHole: Download and install the latest version of BlackHole from its official source. The standard installation will add a new audio device to your system.
Open Audio MIDI Setup: This utility is pre-installed on your Mac. You can find it in
Applications > Utilities, or by searching for it with Spotlight (Command-Space).Create a Multi-Output Device: In the Audio MIDI Setup window, click the ‘+’ button in the bottom-left corner and select ‘Create Multi-Output Device’. This new device will let you send audio to two places at once: your speakers (so you can hear) and BlackHole (so your Mac can record).
Configure the Multi-Output Device: Select the new device in the list. In the panel on the right, check the boxes for both ‘MacBook Pro Speakers’ (or your headphones) and ‘BlackHole 16ch’. Crucially, ensure that your speakers/headphones are selected as the ‘Master Device’ and that ‘Drift Correction’ is checked for BlackHole.
Set Your Mac's Sound Output: Open System Settings > Sound. Under the ‘Output’ tab, select the ‘Multi-Output Device’ you just created. Now, all your Mac's audio will play through your speakers and simultaneously be sent to BlackHole.
Record with QuickTime: Open QuickTime Player and go to File > New Screen Recording (or press Shift-Command-5). Click ‘Options’ and, under the ‘Microphone’ section, select ‘BlackHole 16ch’. Now when you record, QuickTime will capture the audio coming from your applications.
Trade-off: This method is powerful but requires manual setup. You'll also need to remember to switch your sound output back to your standard speakers when you're finished recording.
Method 2: The Best Screen Recording Apps for Mac
If the manual setup of a virtual driver seems too complex, or if you need more advanced features like editing and polishing, a dedicated screen recorder is the most efficient choice. These apps handle internal audio capture automatically and offer a suite of tools to improve your final video.
Cinemak: Best for Free, High-Quality Recording
Cinemak stands out by offering its core, high-performance recording engine for free. It captures internal audio and microphone input without any complicated setup. Its primary differentiator is the set of automated polishing features. The free plan includes unlimited recording, editing, and export in up to 4K resolution at 60 frames per second, with no account required. This makes it an excellent choice for creators who need professional quality without an upfront investment.
- Internal Audio Capture: Built-in; just select it as a source.
- Key Features: Automatic zoom that follows the action, cursor smoothing, and custom backgrounds are applied the moment recording stops. The app is a single pipeline for capture, polish, and sharing.
- Pricing: The core recorder is free. Users pay only for add-ons like Cinemak Cloud for hosting, analytics, and embeds, plus AI credits for voice translation.
- Best For: Founders, creators, and product teams who want polished videos without manual editing. You can download Cinemak's free recorder here.
Screen Studio: Best for Polished Marketing Videos
Screen Studio is a premium tool focused on creating exceptionally polished and engaging screen recordings with minimal effort. It automatically adds smooth cursor movements, dynamic zooms on clicks, and professional-looking backgrounds. It's designed for users creating product demos, tutorials, and social media content where aesthetic quality is paramount.
- Internal Audio Capture: Built-in and seamless.
- Key Features: Automatic motion blur, zoom animations, and a polished video editor.
- Pricing: One-time purchase, typically around $99.
- Best For: Marketers and SaaS companies creating high-end promotional videos.
CleanShot X: Best for Productivity and Annotations
CleanShot X is more than just a screen recorder; it's a complete toolkit for screen capture. It replaces the native macOS screenshot tool with a more powerful version that includes scrolling capture, annotations, and cloud storage. Its video recording is quick and lightweight, making it ideal for bug reports, quick instructions, and general productivity.
- Internal Audio Capture: Requires a separate, free companion app to be installed once.
- Key Features: Robust annotation tools, cloud sharing with custom domains, scrolling screenshots.
- Pricing: One-time purchase or available through a Setapp subscription.
- Best For: Support teams, developers, and anyone who takes many screenshots and quick recordings daily.
| Feature | QuickTime + BlackHole | Cinemak | Screen Studio | CleanShot X |
|---|---|---|---|---|
| Internal Audio Capture | Manual Setup | Built-in | Built-in | Requires free companion app |
| Automatic Polishing | None | Auto-zoom, cursor smoothing, custom backgrounds | Auto-zoom, motion blur | None |
| Editing Capabilities | Basic Trims | Timeline-free editor | Full video editor | Basic Trims, Annotations |
| Pricing Model | Free | Freemium (Core recorder is free) | One-time Purchase | One-time Purchase or Subscription |
| Best For | Cost-free internal audio capture | Polished recordings without cost or effort | High-end marketing & demo videos | All-in-one productivity & quick captures |
FAQ
How can I record my screen and audio at the same time?
You can use the built-in Screenshot tool (Shift-Command-5) and select a microphone to record your voice. To also record your Mac's internal audio, you'll need to either configure the free BlackHole driver with QuickTime or use a dedicated third-party app like Cinemak or Screen Studio that captures all sources simultaneously.
How to screen record and speak at the same time on Mac?
Press Shift-Command-5 to open the Screenshot toolbar. Click 'Options' and select your internal or an external microphone. When you start recording, your Mac will capture everything on your screen as well as everything you say into the selected mic. Most dedicated apps also offer this as a standard feature.
Why can't I hear audio when I screen record on Mac?
This usually happens for two reasons: either you didn't select a microphone in the recording options, or you're trying to record app sounds. macOS's built-in tools do not record internal audio by default. You must use a solution like BlackHole or a dedicated app to capture it.
How do I record internal audio on my Mac?
The most reliable methods are using a dedicated app with a built-in audio driver or installing the free BlackHole virtual audio driver. The app method is simpler, while the BlackHole method is free and works with QuickTime Player once you complete the initial setup in Audio MIDI Setup.