Yes, Mac screen recording can record audio, but it requires you to enable a source first. By default, captures are silent. You can easily record external audio (your voice) using built-in tools, but recording internal system audio (sounds from apps) requires either a complex free workaround or a dedicated application.
How to Record Your Screen and Voice on Mac (The Built-in Method)
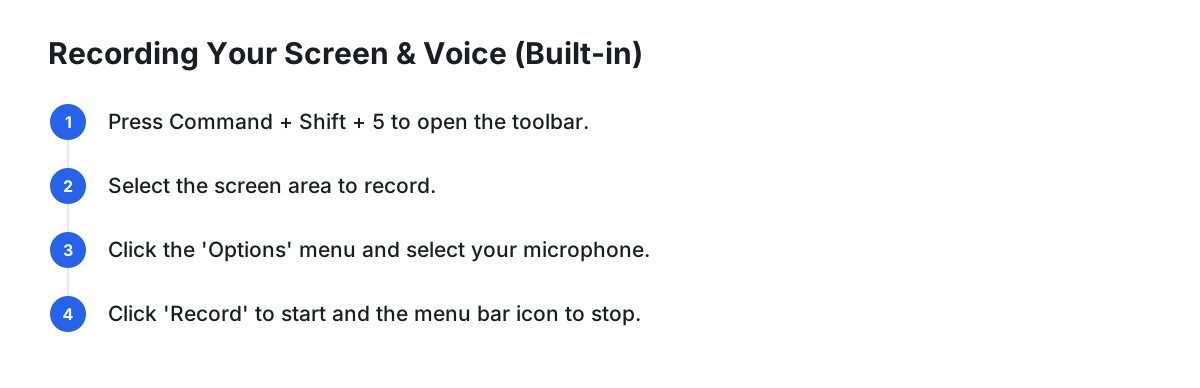
For narrating presentations or creating simple tutorials, your Mac's built-in Screenshot toolbar is all you need. It uses your microphone to capture your voice alongside the video.
Step-by-Step Instructions:
- Open the Toolbar: Press
Command + Shift + 5on your keyboard. A control bar will appear at the bottom of the screen. - Select Recording Area: Choose either "Record Entire Screen" or "Record Selected Portion." Drag the corners of the frame to resize it if you choose the latter.
- Choose Your Microphone: This is the crucial step. Click the Options menu. Under the "Microphone" section, select "Built-in Microphone" or any external USB mic you have connected.
- Start and Stop: Click "Record" to begin. A stop icon (a circle with a square) will appear in your menu bar. Click it or press
Command + Control + Escto end the recording.
Pro-Tips for the Built-in Recorder
Beyond the basics, the Options menu offers more control:
- Timer: Set a 5 or 10-second countdown, giving you time to prepare your screen before the recording starts.
- Save to: By default, videos save to your Desktop. You can change this to Documents, Clipboard, or another folder for better organization.
- Show Floating Thumbnail: Keep this checked to see a small preview in the corner after you stop, allowing you to quickly trim or share it.
Troubleshooting: If your microphone doesn't appear in the list, go to System Settings > Privacy & Security > Microphone and ensure the app you're using (e.g., QuickTime Player) has permission.
How to Record Mac Screen with Internal System Audio
Capturing the sound from a game, a browser video, or a music app is impossible with the default tools alone. macOS doesn't offer a direct channel for this. Here are the two main approaches.
Method 1: The BlackHole Workaround (Detailed Steps)
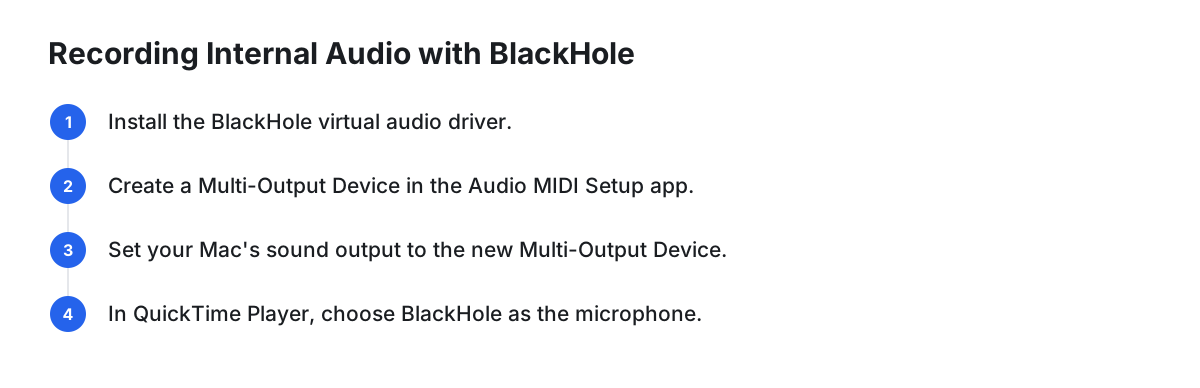
This free method uses a virtual audio driver called BlackHole to create a new audio pathway that recording software can listen to. It's powerful but requires precise setup.
Step 1: Install BlackHole
- Go to the official BlackHole repository on GitHub (Existential Audio) and download the latest installer package.
- Run the installer and follow the on-screen prompts.
Step 2: Configure Audio MIDI Setup
- Open the "Audio MIDI Setup" app (you can find it in
Applications > Utilitiesor by using Spotlight search). - Click the + icon in the bottom-left corner and select "Create Multi-Output Device."
- In the panel that appears, check the boxes for both BlackHole and your primary audio output (e.g., MacBook Pro Speakers or External Headphones). This is vital—it lets you hear the audio while also sending it to the virtual driver.
- (Optional) Rename the new device to something memorable, like "Screen Recording Audio."
Step 3: Set Your Mac's Sound Output
- Go to System Settings > Sound.
- Under "Output," select the "Multi-Output Device" you just created.
Step 4: Record with QuickTime Player
- Open QuickTime Player and start a new screen recording (
File > New Screen RecordingorCommand + Shift + 5). - In the Options menu, set the Microphone to BlackHole.
- Press record. Now, any sound your Mac plays will be captured in the video file in high fidelity.
Remember to switch your sound output back to your standard speakers or headphones when you're done.
How to Record with Internal Audio and Headphones
A common issue arises when using headphones: the audio goes directly to them, bypassing the output channels. The BlackHole setup can solve this. When you create your Multi-Output Device in Audio MIDI Setup (Step 2), simply ensure you check three boxes: your headphones, BlackHole, and your built-in speakers. This configuration sends audio to all destinations simultaneously, so you can monitor on your headphones while BlackHole captures the sound for your recording.
Best Screen Recorder Apps for Mac with Internal Audio
If the BlackHole method feels too technical, a dedicated application is a far simpler and more reliable solution. These tools handle internal audio capture natively and often come with powerful editing and polishing features.
- Cinemak: Best for creators and teams who want polished videos with zero effort. Its standout feature is automatic enhancement—the moment you stop recording, it applies cursor smoothing and auto-zooms on clicks to create a professional tutorial video. The free plan is incredibly generous, offering unlimited recording and editing at up to 4K / 60fps export quality.
- OBS Studio: Best for live streamers and technical users. OBS is free, open-source, and endlessly customizable. You can mix multiple audio and video sources, create complex scenes, and stream directly to platforms like Twitch and YouTube. Its power comes with a steep learning curve that can be intimidating for beginners.
- Screenflow: Best for professional video producers. Screenflow combines a high-quality screen recorder with a robust, timeline-based video editor. It's a one-stop shop for creating and editing complex tutorials and software demos. It's a premium product with a significant one-time purchase price.
- Descript: Best for podcasters and content repurposers. Descript's unique feature is its transcript-based editor; you edit the video by simply editing the text of its auto-generated transcript. While powerful for dialogue-heavy content, it's a subscription-based service and may be overkill for straightforward screen captures.
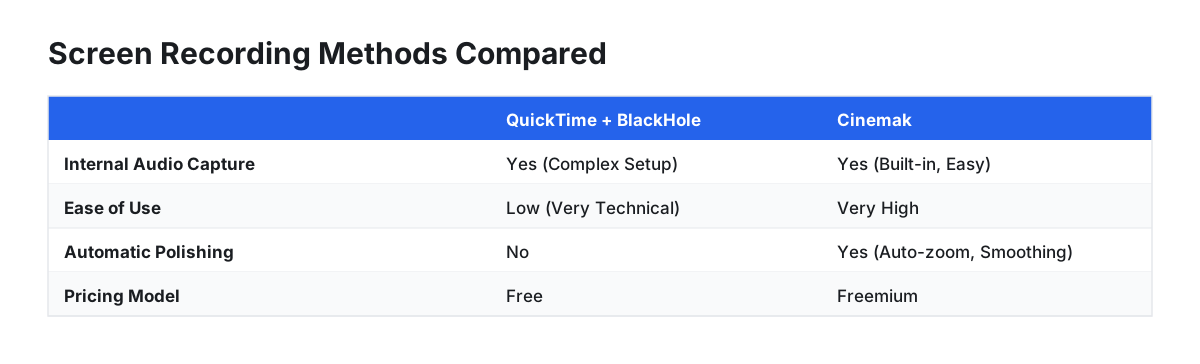
Comparison of Mac Screen Recording Methods
| Feature | QuickTime + BlackHole | Cinemak | OBS Studio | Screenflow | Descript |
|---|---|---|---|---|---|
| Internal Audio Capture | Yes (Complex Setup) | Yes (Built-in, Easy) | Yes (Built-in) | Yes (Built-in) | Yes (Built-in) |
| Editing Suite | Basic Trimming Only | Timeline-free, Reframing | None (Requires other tools) | Advanced Timeline Editor | Transcript-based Editor |
| Ease of Use | Low (Very Technical) | Very High | Low | Medium | High |
| Automatic Polishing | No | Yes (Auto-zoom, Cursor Smoothing) | No | No | Yes (Studio Sound) |
| Pricing Model | Free | Freemium | Free (Open-Source) | One-Time Purchase | Subscription |
| Best For | Technical users on a budget | Fast, polished demos & tutorials | Live streaming & complex scenes | Professional video production | Editing spoken-word content |
If you want the power of a professional tool without the steep learning curve or complex workarounds, Cinemak is the ideal starting point. It automates the tedious parts of creating a great-looking screen capture, letting you focus on your content. You can download Cinemak for free and create a polished, 4K video with perfect audio in minutes.
FAQ
How do I record my screen with audio on Mac?
The easiest way is to press Command + Shift + 5 to open the Screenshot toolbar, click "Options," and select your microphone. For recording internal system audio from apps, you need a dedicated app like Cinemak or a manual workaround using a tool like BlackHole.
Why doesn't my screen recording have audio on my Mac?
Your screen recording is silent because macOS defaults to capturing no audio for privacy reasons. You must manually select an audio source from the "Options" menu in the Screenshot toolbar (Command + Shift + 5) before you start recording. If no microphone is chosen, the recording will be mute.
Can I screen record on my Mac with me talking?
Yes, you can easily record your screen with your voice. Press Command + Shift + 5, click the "Options" menu in the toolbar that appears, and select "Built-in Microphone" or any connected external microphone. Then, press record to capture both your screen and your narration.
Do the screen recorder on Mac have audio included?
No, the built-in Mac screen recorder does not include audio by default. You have to manually enable an audio source, such as the internal microphone, from the options menu before recording. It cannot capture your computer's internal sounds without a third-party application or a virtual audio driver.