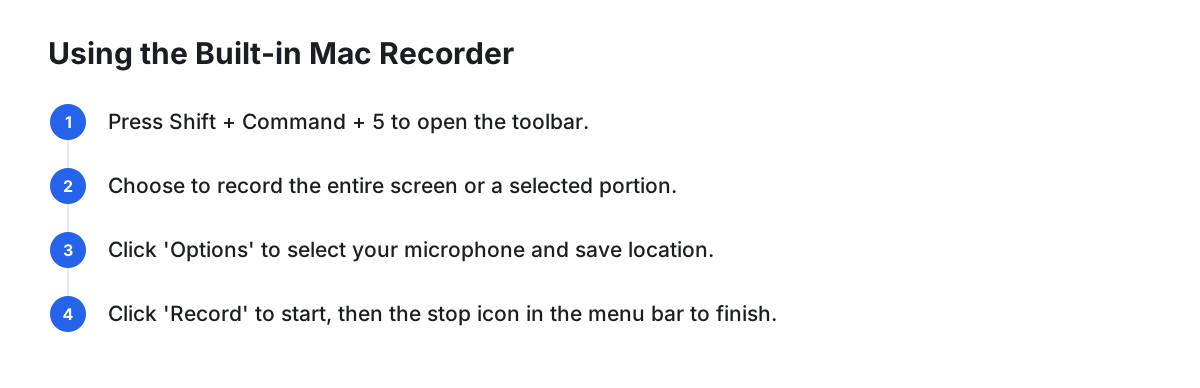
Capturing your Mac’s screen is simple. Press Shift-Command-5 to open the Screenshot toolbar. From there, you can choose to record your entire screen or a selected portion. Click the “Options” menu to select your microphone for audio, then click “Record” to begin. This is the fastest native method.
How to Use the Built-in Mac Screen Recorder
Your Mac includes a surprisingly capable screen recording tool, perfect for quick captures without installing any software. It's built into the same utility you use for screenshots.
Step 1: Open the Screenshot Toolbar
Press Shift + Command + 5 on your keyboard. A control bar will appear on your screen. This is your command center for both screenshots and screen recordings. If the shortcut doesn't work, check your settings under System Settings > Keyboard > Keyboard Shortcuts > Screenshots to ensure it's enabled.
(A screenshot showing the macOS desktop with the Screenshot toolbar visible at the bottom of the screen would go here.)
Step 2: Choose Your Recording Area
In the toolbar, you'll see two icons for video recording:
- Record Entire Screen: An icon showing a screen with a solid outline. This captures everything on your display.
- Record Selected Portion: An icon with a dotted outline. This lets you click and drag to define a specific recording area.
Step 3: Configure Recording Options
Click the “Options” button to customize your capture. This is a critical step.
(An annotated screenshot of the "Options" menu, highlighting the Microphone and Save to sections, would go here.)
- Save to: Select where your video file will be saved. The default is your Desktop.
- Timer: Set a 5 or 10-second delay to give yourself time to prepare your screen before the recording starts.
- Microphone: This is how you record your voice. Select “Built-in Microphone” or any external USB mic you have connected.
- Show Mouse Clicks: Enable this to create a visual indicator around your pointer every time you click, which is invaluable for tutorials.
Step 4: Start and Stop Recording
Click the “Record” button to start. When you're finished, a small stop icon (a circle with a square inside) will appear in the top menu bar. Click it to end the recording. You can also press Command-Control-Escape.
(A close-up screenshot of the macOS menu bar, highlighting the small stop icon, would go here.)
Once stopped, a thumbnail of the video appears in the bottom-right corner. Click it to trim the start and end, or do nothing and it will save automatically to your chosen location.
How to Record Mac Screen with Internal Audio (The Definitive Guide)
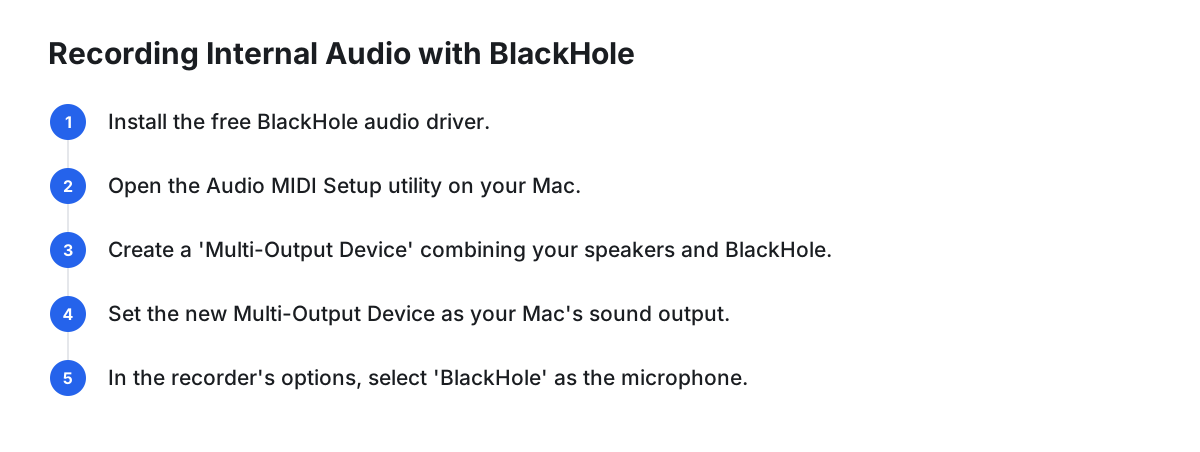
Recording your voice is easy, but what about the sound from an application or a video playing on your Mac? macOS doesn't allow this natively for security reasons. The solution is to create a virtual audio device that routes your Mac's system audio into a recordable input. This guide shows you how using a free tool called BlackHole.
Step 1: Install BlackHole
BlackHole is a trusted, open-source audio driver. Download the latest version from the developer's website and run the installer package, following the on-screen prompts.
Step 2: Open the Audio MIDI Setup Utility
This utility is already on your Mac. Open Finder > Applications > Utilities, and then double-click on Audio MIDI Setup.
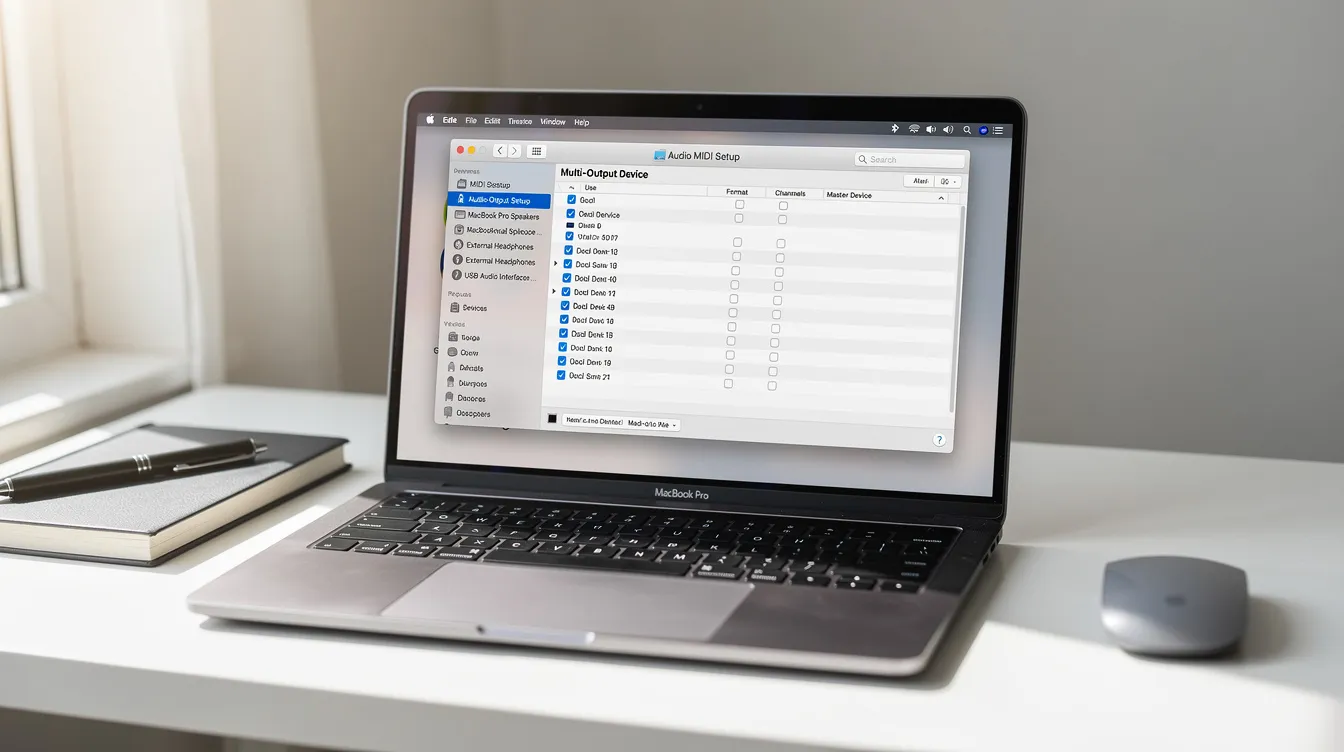
(A screenshot of the Audio MIDI Setup window, showing a list of audio devices on the left, would go here.)
Step 3: Create a Multi-Output Device
This crucial step lets you hear your computer's audio while also sending it to BlackHole for recording.
- In the Audio MIDI Setup window, click the + button in the bottom-left corner and select “Create Multi-Output Device.”
- A new device will appear in the list. Select it.
- In the panel on the right, check the boxes for both your primary output (e.g., “MacBook Pro Speakers” or external headphones) and “BlackHole 16ch.”
- Important: For your primary output, check the “Drift Correction” box. This prevents the audio from going out of sync.
(An annotated screenshot of the Multi-Output Device setup, highlighting the checked boxes for the main output and BlackHole, and the Drift Correction checkbox, would go here.)
Step 4: Set Your Mac’s Sound Output
In System Settings > Sound, go to the “Output” tab and select the “Multi-Output Device” you just created. Now, your Mac's audio will play through your speakers and simultaneously route to BlackHole.
Step 5: Record with the Correct Input
Now, open the screen recorder by pressing Shift-Command-5. Click “Options,” and under the Microphone section, you will now see “BlackHole 16ch.” Select it. When you press record, your Mac's system audio will be captured perfectly in the video.
How to Record Your Screen with a Camera Overlay (Picture-in-Picture)
The built-in Mac recorder cannot record your screen and your webcam at the same time. To create a picture-in-picture effect, you need a third-party application. Most advanced screen recorders offer this as a core feature.
For example, using an app like Loom or ScreenFlow, the process is typically:
- Open the application and start a new recording.
- Select both Screen and Camera as sources.
- Your webcam feed will appear in a bubble or square on the screen.
- Drag your camera overlay to your desired corner (e.g., bottom-right).
- Click record. Both your screen and your face will be captured simultaneously.
This is essential for creating personal tutorials, product walkthroughs, and reaction videos where connecting with your audience is key.
The Best Screen Recording Apps for Mac Compared
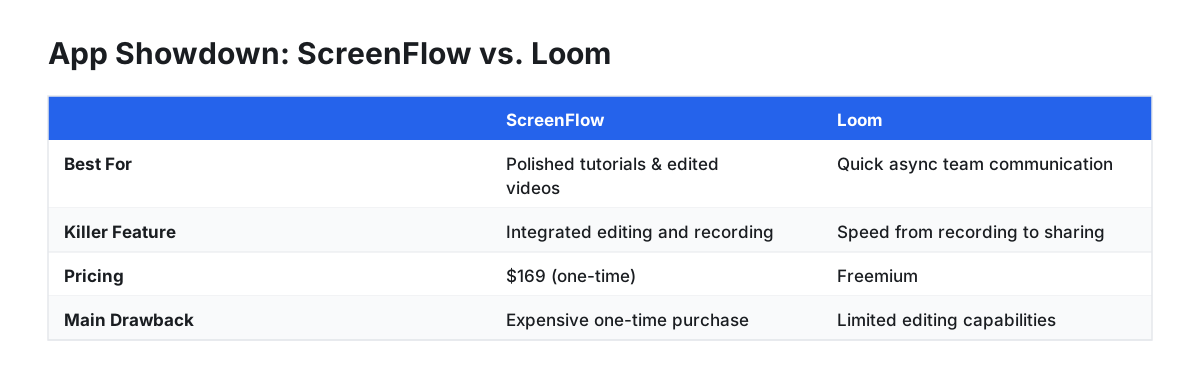
When you need more power than the built-in tool provides—like internal audio, editing, or camera overlays—it's time for a dedicated app. Here’s how the top contenders stack up.
| Tool | Pricing | Best For | Key Features | Killer Feature |
|---|---|---|---|---|
| OBS Studio | Free | Live streaming & complex productions | Scene composition, audio mixing, filters | Unmatched customization & control |
| Loom | Freemium | Quick async team communication | Instant cloud sharing, comments, transcriptions | Speed from recording to sharing |
| ScreenFlow | $169 (one-time) | Polished tutorials & edited videos | Powerful timeline editor, annotations, effects | Integrated editing and recording workflow |
| Cinemak | Free (Paid Add-ons) | Effortless product demos & tutorials | Auto-zoom, cursor smoothing, 4K/60fps export | Automatic post-production polish |
OBS Studio
OBS (Open Broadcaster Software) is the go-to for technical users and live streamers. It’s incredibly powerful, allowing you to create complex scenes with multiple sources (screen, camera, windows, images). However, its power comes with a steep learning curve that can feel like overkill for a simple recording.
- Pros: Completely free, highly customizable, cross-platform.
- Cons: Not user-friendly for beginners, resource-intensive.
Loom
Loom is built for speed and collaboration. It excels at recording quick video messages for colleagues, where you can record your screen and camera, and the video is instantly uploaded to the cloud with a shareable link. It's less of a video production tool and more of a communication tool.
- Pros: Extremely easy to use, great for team collaboration, instant sharing.
- Cons: Limited editing capabilities, free plan has recording time limits.
ScreenFlow
ScreenFlow by Telestream is a long-standing favorite for Mac power users creating professional tutorials. It combines a high-fidelity screen recorder with a robust, timeline-based video editor in one package. You can record, then immediately dive into editing, adding callouts, text, and animations.
- Pros: Powerful, integrated editor; excellent annotation tools; high-quality output.
- Cons: Expensive one-time purchase, macOS only.
Cinemak
Cinemak is designed for users who want polished, professional-looking demos without spending time in an editor. Its unique value is what happens after you record. The free app automatically applies auto-zoom to follow your action, smooths out jerky cursor movements, and can add a custom background. This creates a ready-to-share video in seconds. It's a full pipeline for capture, polish, and hosting. The core recording and polishing app is free with unlimited recording and 4K/60fps export, with paid add-ons for cloud hosting and AI features.
- Pros: Automatic post-production polish, free for local recording and export, high-quality output.
- Cons: Advanced timeline editing requires another tool, hosting and AI are paid services.
FAQ
How do you screen record in Mac?
A fast way to screen record on a Mac is to press Shift-Command-5. This shortcut opens the Screenshot toolbar, where you can select to record the entire screen or a specific portion, adjust options like the microphone, and start your recording.
How do I record video with sound on my Mac?
To record your voice, press Shift-Command-5, click “Options,” and select a microphone. To record the sound coming from your Mac's apps (internal audio), you must install a free tool like BlackHole, create a Multi-Output device in the Audio MIDI Setup utility, and then select BlackHole as your microphone input.
How can I record my screen with system audio on my Mac?
First, install a free virtual audio driver called BlackHole. Then, open the Audio MIDI Setup utility on your Mac, create a "Multi-Output Device" that includes both your speakers and BlackHole, and set it as your Mac's sound output. Finally, in the screen recorder's options, choose "BlackHole" as your microphone to capture the system sound.
Why can't I find my screen recording on my MacBook?
By default, your screen recordings are saved directly to your Desktop. If you can't find it there, press Shift-Command-5 to open the recorder's toolbar, click “Options,” and check the “Save to” section to see which folder is set as your save location.