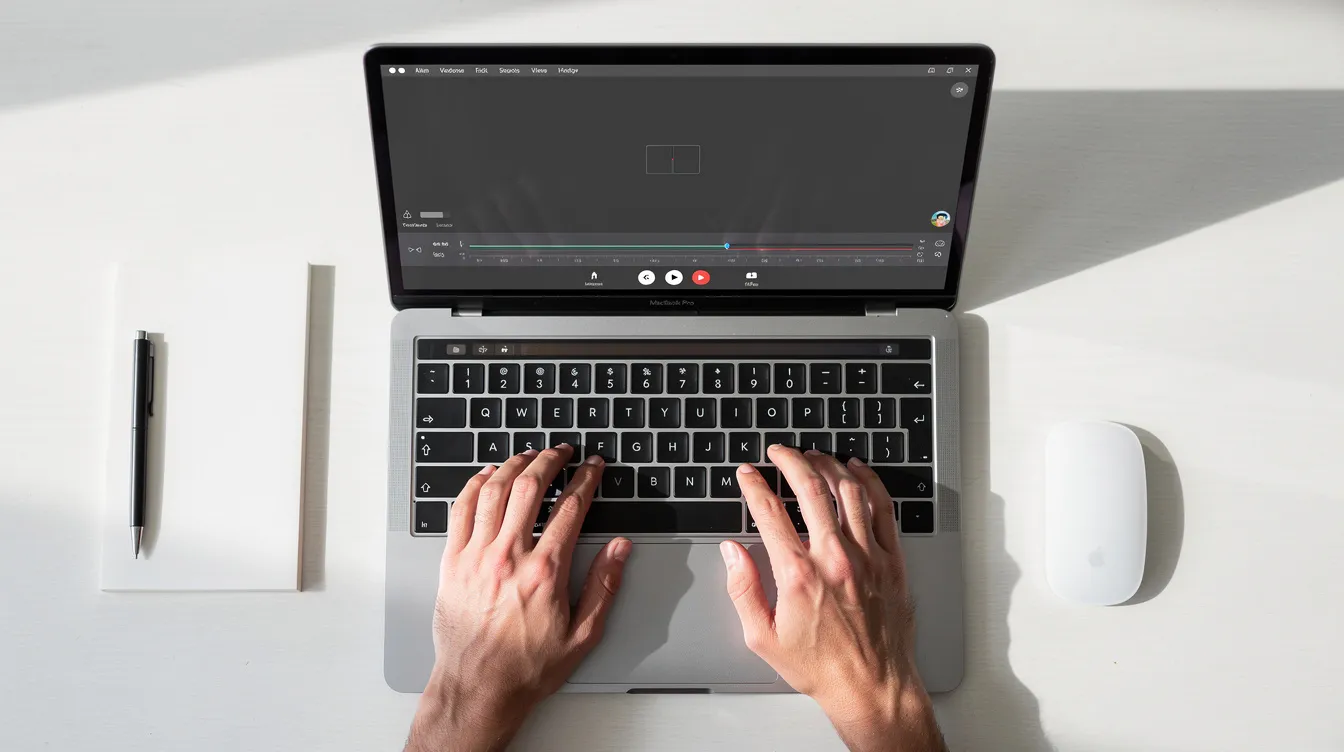
The primary Mac screen recorder shortcut is Command + Shift + 5. This command opens the macOS Screenshot and video capture toolbar, giving you immediate options to record your entire screen, a selected portion, or a specific window, with or without including audio from your microphone.
What is the Mac Screen Recorder Shortcut?
The main keyboard shortcut to access Apple's native tools for capturing your screen on a Mac is Command + Shift + 5. This shortcut, available on macOS Mojave (10.14) and later, brings up a control panel at the bottom of your screen with all the tools you need to capture still images or record video of your screen activity.
This single command is the fastest way to initiate a recording without opening a separate application like QuickTime Player or Photo Booth. The control bar it summons provides two distinct icons for video recording:
- Record Entire Screen: A solid rectangle with a circle in the corner. This captures everything visible on your monitor.
- Record Selected Portion: A dotted rectangle with a circle in the corner. This allows you to click and drag a box around the specific area you wish to record.
This built-in utility is the starting point for any screen capture on macOS, offering a convenient, system-level solution for basic recording tasks.
How to Use the Cmd + Shift + 5 Shortcut: A Step-by-Step Guide
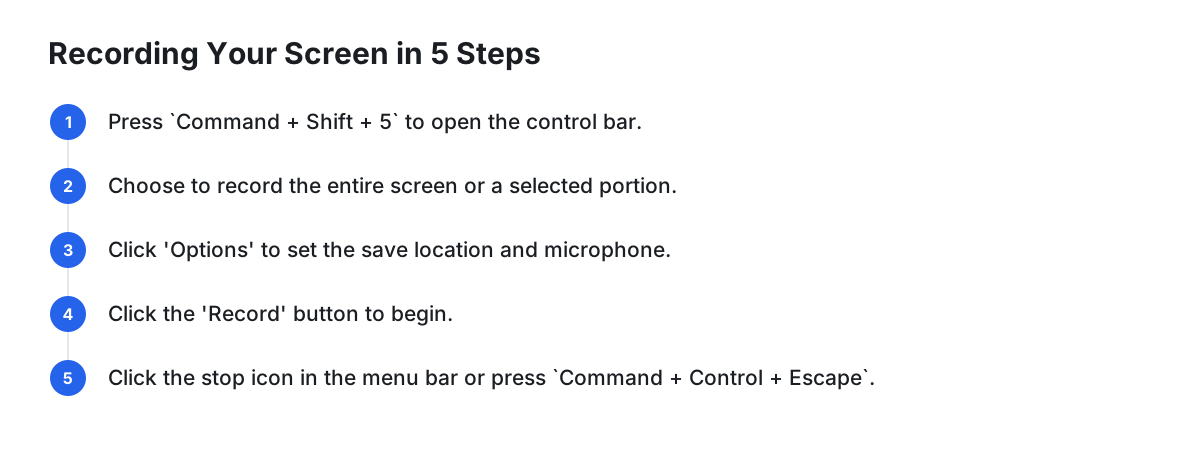
Using the Mac screen recorder shortcut is a straightforward process. Follow these steps to capture your first recording in under a minute.
Press the Shortcut: Press
Command + Shift + 5simultaneously. A control bar will appear at the bottom of your screen, and your cursor will change depending on the selected mode.Choose Your Recording Area: In the control bar, select either the "Record Entire Screen" icon or the "Record Selected Portion" icon. If you choose the selected portion, your cursor will turn into a crosshair; click and drag to draw a box around the area you want to capture.
Configure Your Options: Before recording, click the "Options" button on the control bar. This menu is crucial for customizing your recording. Here you can set:
- Save to: Choose where the final video file is saved (Desktop, Documents, etc.).
- Timer: Set a 5 or 10-second countdown before recording begins, giving you time to prepare.
- Microphone: Select a microphone source if you want to record your voice. You can choose the "Built-in Microphone" or any connected external mic.
- Other Options: Show the mouse pointer in the recording.
Start Recording: Once your settings are configured, click the "Record" button on the far right of the control bar. If you're recording the full screen, the bar will disappear, and recording will begin. If you're recording a portion, click inside your selected area to start.
Stop Recording: To end the recording, a small stop button (a circle with a square inside) will appear in the menu bar at the top right of your screen. Click it. Alternatively, you can press
Command + Control + Escapeto stop the recording immediately. The video will be saved to your chosen location.
How Do I Record My Mac Screen with Audio?
To record your Mac screen with audio, use the "Options" menu within the Command + Shift + 5 toolbar. After pressing the shortcut, click on "Options" and look for the "Microphone" section. From here, you can select your Mac's "Built-in Microphone" or any external USB microphone you have connected.
However, a common challenge is recording the computer's internal audio—the sounds coming from apps, videos, or games. By default, macOS does not provide a way to capture this system audio directly for security reasons. To do this with the built-in tool, you would need to install a third-party virtual audio driver, which can be a complex and unreliable setup process.
This limitation is one of the primary reasons users turn to more advanced screencasting applications that handle both microphone and system audio seamlessly within a single interface.
Limitations of the Built-in Mac Recorder
The Command + Shift + 5 shortcut is excellent for quick, simple captures, but it has significant limitations when you need a professional or polished result. These shortcomings often become apparent once you move beyond basic recording.
- No Internal Audio Capture: As mentioned, recording system sound is not supported natively.
- Minimal Editing Features: After recording, you can only perform a basic trim. There are no tools for cropping the video frame, adding zooms, annotating, or smoothing out jerky cursor movements.
- Fixed Output Quality: You have no control over the resolution, frame rate, or file format. The system defaults to a .mov file, which may not be ideal for web sharing.
- No Polishing Effects: The raw recording is exactly what you get. There are no automatic features to enhance the final video, such as dynamically zooming in on important actions or smoothing the path of the cursor.
- No Hosting or Sharing: Once saved, the video is just a local file. There are no integrated tools to quickly generate a shareable link or get analytics on who has viewed it.
For anyone creating tutorials, product demos, or presentations, these limitations mean spending significant extra time in separate video editing software to get a usable result.
The Professional Alternative: Instantly Polished Recordings

When the built-in recorder's limitations hinder your workflow, a dedicated tool is the answer. Cinemak is a free macOS screen recorder designed for founders, creators, and product teams who need polished results without the manual post-production effort.
Where the native tool stops, Cinemak begins. It's built to automate the tedious parts of creating a professional screencast. The moment you stop recording, Cinemak automatically polishes the video with features like auto-zoom on clicks and cursor smoothing to create a clean, guided feel. You can even apply custom backgrounds instantly.
Key features that overcome the native recorder's weaknesses include:
- Studio-Quality Export: Export your recordings in up to 4K resolution at 60 frames per second, ensuring crystal-clear quality.
- Timeline-Free Editing: Quickly trim your video, drop in keyframes for reframing, or create seamless loops with the 'Loop cursor' feature without wrestling with a complex timeline editor.
- Unlimited & Free: The core application is completely free, offering unlimited recording and editing with 4K/60fps export, all without needing an account.
Comparison: macOS Built-in Recorder vs. Cinemak
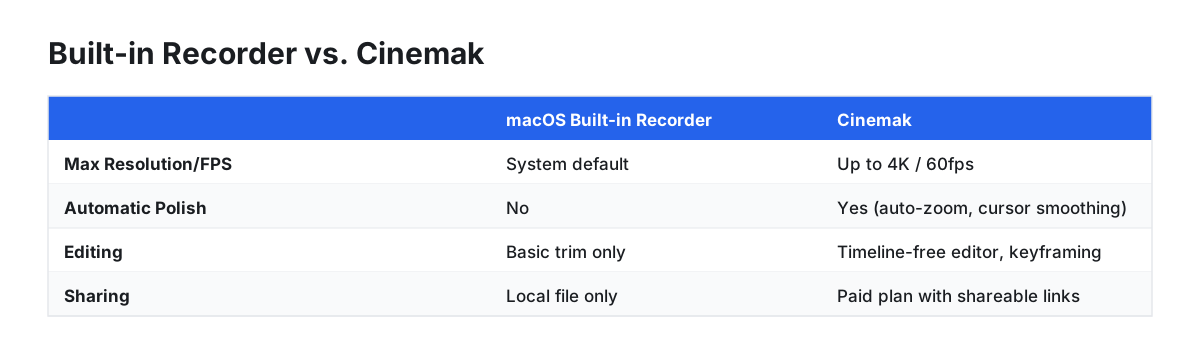
| Feature | macOS Built-in Recorder (Cmd+Shift+5) |
Cinemak |
|---|---|---|
| Price | Free (built-in) | Free (unlimited recording & 4K export) |
| Max Resolution/FPS | System default | Up to 4K / 60fps |
| Audio Recording | Microphone only | Microphone & iPhone capture via USB |
| Automatic Polish | No | Yes (auto-zoom, cursor smoothing, custom backgrounds) |
| Editing | Basic trim only | Timeline-free editor, keyframing, reframing, cropping |
| Sharing & Hosting | Local file only | Paid Cloud plan with shareable links, analytics, comments & reactions |
| AI Features | None | Paid AI credits for voice translation & AI avatar lip-sync |
Manually editing recordings to look professional is time-consuming. Cinemak automates it, delivering a polished video the second you hit stop. Download Cinemak for free and create studio-quality video captures in seconds.
How to Stop a Screen Recording on a Mac
To stop an active capture session on a Mac, click the small stop icon located in your menu bar at the very top of the screen. The icon looks like a circle with a solid square inside it.
If you have many icons in your menu bar or can't find the button, there is a universal keyboard shortcut that will always work: Command + Control + Escape. Pressing these three keys together will immediately end the recording and save the video file to the destination you selected in the Options menu.
FAQ
How do I screen record on my Mac?
The fastest way to screen record on a Mac is to use the keyboard shortcut Command + Shift + 5. This opens the native Screenshot and recording toolbar, where you can choose to record your full screen or a selected portion.
How do I record a video with sound on my Mac?
To record a video with your voice, press Command + Shift + 5, click "Options," and select a microphone from the list. To record your computer's system audio, you'll need a dedicated app like Cinemak, as macOS doesn't support this feature natively.
How to screen record on Mac without sound?
To record without any audio, press Command + Shift + 5 to open the recording controls. Click the "Options" menu and ensure that under the "Microphone" section, "None" is selected. This will capture video only.
Is there a shortcut for screen recording?
Yes, the primary shortcut for screen recording on a Mac is Command + Shift + 5. This single command gives you access to all of macOS's built-in screen capture and video tools.