Open Broadcaster Software (OBS) is a powerful, free, and open-source tool for high-quality desktop capture. To get started, download OBS, run the auto-configuration wizard for recording, add a Display Capture or Window Capture source, configure your audio devices, and press Start Recording.
OBS Studio is renowned in the live streaming community, but its robust features make it one of the best free tools for capturing your screen available for Windows, macOS, and Linux. It gives you granular control over every aspect of your video, from resolution and frame rate to audio mixing and encoding, without watermarks or time limits.
Is OBS a Good Choice for Capturing Your Screen?
Yes, OBS is an excellent choice for making screencasts, especially if you need professional-level control and high-quality output for free. It can capture multiple sources simultaneously (your screen, webcam, microphone, application audio) and record in resolutions up to your monitor's native capability at a smooth 60 FPS.
The primary trade-off is its complexity. Because OBS is designed for live broadcasters, its interface can be intimidating for users who just want to capture a quick tutorial or product demo. The initial setup requires navigating through several settings panels to get the best results, which isn't always intuitive for beginners.
How to Set Up OBS for Video Capture: A Step-by-Step Guide
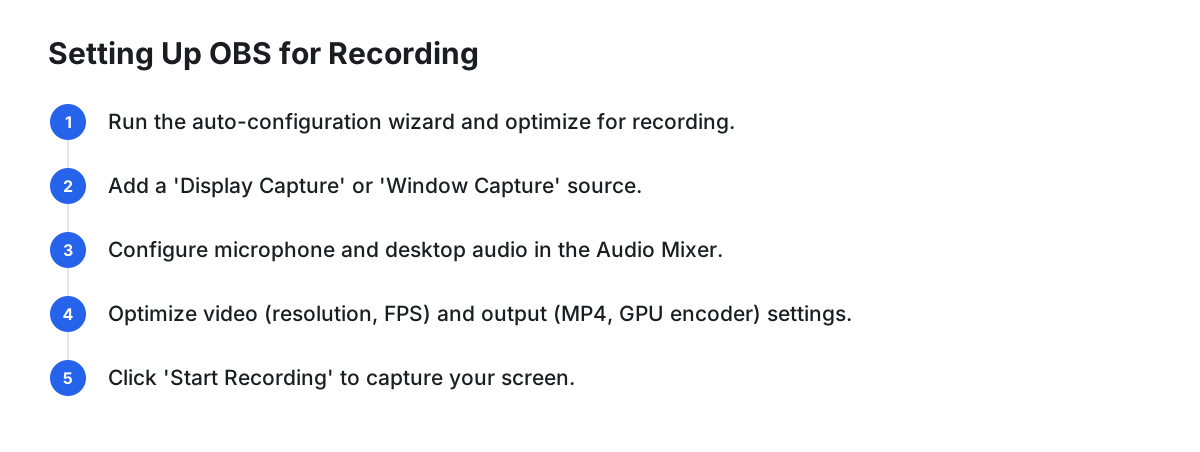
Follow these steps to configure OBS for high-quality, local video captures. This initial setup will ensure your files are crisp, smooth, and saved in a widely compatible format.
1. Download, Install, and Run the Auto-Configuration Wizard
First, download the correct version of OBS Studio from the official website (obsproject.com) for your operating system (Windows, macOS, or Linux). After installing, the Auto-Configuration Wizard will likely pop up on the first launch. If it doesn't, you can access it from the Tools menu.
- When prompted, select "Optimize just for recording, I will not be streaming."
- Click
Nextand let OBS test your system to suggest the best settings for resolution and frame rate.
2. Add a Source to Capture Your Screen
By default, your OBS canvas is black. You need to tell it what to record by adding a Source.
- Look for the "Sources" box, located at the bottom of the window.
- Click the
+icon and select your desired source type:- Display Capture: Records your entire monitor. This is the most common choice for general desktop capture.
- Window Capture: Records a single, specific application window. This is useful for focusing on one program without showing your desktop or other apps.
- Game Capture: Optimized for recording full-screen games with minimal performance impact.
- Give your source a descriptive name (e.g., "Main Monitor" or "Chrome Window") and click
OK. - A new window will appear. Select the specific display or window you want to capture from the dropdown menu and click
OK. You should now see your screen mirrored in the OBS preview window.
3. Configure Your Audio Sources
OBS can capture audio from your microphone and your computer's system sounds simultaneously.
- Find the "Audio Mixer" panel.
- By default, you should see
Desktop AudioandMic/Aux. - Speak into your microphone to test it. You should see the meter for
Mic/Auxlight up. If not, click the gear icon next to it, go toProperties, and select the correct microphone from theDevicelist. - Play a sound or video on your computer. The
Desktop Audiometer should move. This confirms OBS is capturing system sounds. - Use the sliders to balance the volume levels.
4. Optimize Your Video and Output Settings
For the best quality and compatibility, you need to adjust a few key settings. Go to File > Settings.
Video Settings:
- Navigate to the
Videotab. - Base (Canvas) Resolution: This should match your monitor's native resolution (e.g., 1920x1080 or 3840x2160).
- Output (Scaled) Resolution: This is the final resolution of your recorded file. For the highest quality, keep this the same as your Base Resolution.
- Common FPS Values: Set this to
60for perfectly smooth motion, ideal for software demos and gameplay. Use30if you are recording a simpler presentation and want to save file space.
Output (Recording) Settings:
- Navigate to the
Outputtab. - Change
Output ModefromSimpletoAdvanced. - Click the
Recordingtab. - Recording Path: Choose the folder where you want your recordings saved.
- Recording Format: Change the default
.mkvto.mp4. While MKV is safer if your system crashes, MP4 is universally compatible with video editors and web platforms. - Encoder: If you have a modern NVIDIA or AMD graphics card, choose
NVIDIA NVENC H.264orAMD VCE H.264. Using your GPU for encoding will result in better performance than using your CPU (x264). - Rate Control: Select
CQP(Constant Quantization Parameter). This method provides excellent quality for local recordings. ACQ Levelbetween 18-23 is a great starting point (lower numbers mean higher quality and larger files).
Click Apply and OK to save your changes.
5. Start, Stop, and Locate Your Recording
With everything configured, the process is simple:
- Click the
Start Recordingbutton in the "Controls" panel. - Minimize OBS and perform the actions you want to record.
- When finished, bring up the OBS window and click
Stop Recording. The same button is used for both actions. - To find your saved file, go to
File > Show Recordings.
Common OBS Recording Problems & Solutions
Even with a perfect setup, you might encounter issues. Here’s a quick troubleshooting table for the most common problems.
| Problem | Common Cause | Solution |
|---|---|---|
| Black Screen Recording | Permissions issue (especially on macOS) or a GPU conflict. | On Windows, try running OBS as an Administrator. On macOS, ensure you've granted OBS Screen Recording permissions in System Settings > Privacy & Security. Switching from Display Capture to Window Capture can also resolve this. |
| Laggy or Stuttering Video | System overload, incorrect encoder settings, or high resolution/FPS. | Close other resource-intensive applications. Ensure you are using a hardware encoder (NVENC/AMF) if available. In Settings > Video, try lowering the Output Resolution (e.g., to 1080p) or the FPS (e.g., to 30). |
| No Audio in the Recording | Incorrect audio device selected or a muted source. | Double-check that the correct devices are selected in Settings > Audio. In the Audio Mixer, ensure the meters are moving for your sources and that the speaker icon isn't showing a red 'X' (muted). |
| Video File is Too Large | Recording settings are optimized for quality over file size. | In your Output > Recording settings, increase the CQP value (e.g., from 18 to 23). A higher number results in more compression and a smaller file. Recording at a lower resolution or frame rate will also significantly reduce file size. |
When OBS is Overkill: A Simpler Alternative for Polished Recordings
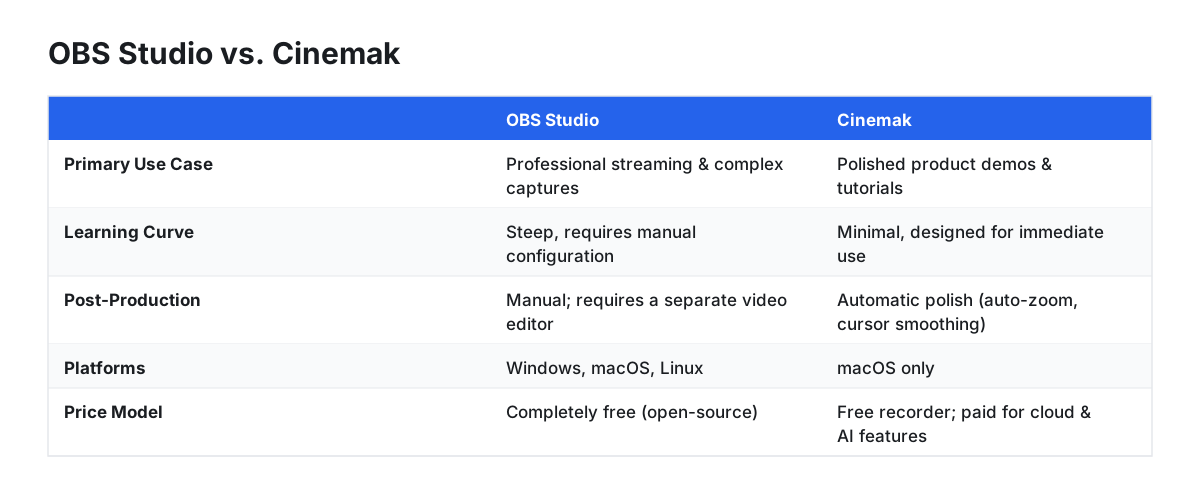
OBS is a phenomenal tool, but its power comes from a professional broadcasting feature set that is often unnecessary for creating a clean product demo, tutorial, or presentation. If your goal is to simply capture your screen and share a polished-looking video without learning a complex interface or using a separate video editor, OBS can feel like overkill.
The process often involves recording in OBS, importing the large MP4 file into an editor, trimming mistakes, adding zooms, and then exporting it again before you can finally share it. For macOS users who need to move faster, a dedicated tool can be more efficient.
| Feature | OBS Studio | Cinemak |
|---|---|---|
| Primary Use Case | Professional streaming & complex captures | Polished product demos & tutorials |
| Learning Curve | Steep, requires manual configuration | Minimal, designed for immediate use |
| Post-Production | Manual; requires a separate video editor | Automatic polish (auto-zoom, cursor smoothing) |
| Platforms | Windows, macOS, Linux | macOS only |
| Hosting & Sharing | Not built-in; requires third-party service | Integrated cloud hosting, analytics, and embeds |
| Price Model | Completely free (open-source) | Free recorder; paid for cloud & AI features |
A tool like Cinemak is designed as a single pipeline for capture, polish, host, embed, and translate. Instead of manual post-production, it automatically polishes recordings with auto-zoom on clicks, cursor smoothing, and custom backgrounds the moment you stop recording. This delivers a ready-to-share video in seconds, exporting in up to 4K resolution at 60 frames per second with no configuration needed.
For a tool that skips the complex setup and automates the polish, you can download the Cinemak screen recorder for free. The free plan includes unlimited recording and editing, plus 4K/60fps export with no account required.
FAQ
Can I use OBS as a screen recorder?
Yes, absolutely. OBS is one of the most powerful and popular free tools for high-quality desktop capture. It offers extensive customization for video and audio settings, far beyond its primary function as live streaming software.
What software can I use to record my screen and audio?
For professional, customizable recording and streaming, OBS Studio is the best free option. For a simpler, faster workflow on macOS with built-in automatic polishing and hosting, Cinemak is a superior alternative. Other popular tools include Camtasia for corporate training and Loom for quick video messaging.
Why is OBS shutting down?
OBS Studio is not shutting down. It is a very active and popular open-source project that receives regular updates from a global community of developers. You may be thinking of another similarly named application, but OBS itself remains a leading tool for recording and streaming.