To screen capture with sound on a Mac, use the Screenshot toolbar (Cmd+Shift+5) and select a microphone for voiceovers. To record your computer's internal audio (app sounds), you must install a free virtual audio driver like BlackHole and configure a Multi-Output Device in the Audio MIDI Setup utility before recording.
Why Can't I Natively Record My Mac's Internal Audio?
The primary reason you can't directly record the audio generated by your Mac is due to macOS's design, which prioritizes privacy and copyright protection. By default, macOS prevents applications from capturing the audio output of other applications. This stops accidental recording of sensitive information or copyrighted material.
There are two types of audio to consider:
- Microphone Audio: This is sound from an external source, captured by your Mac's built-in microphone or a connected external mic. The built-in screen recorder can capture this easily.
- Computer Audio (or Internal Audio): This is the sound generated by your applications—a video playing in your browser, an alert from an app, or in-game audio. Capturing this requires a workaround.
To record these app sounds, you need to create a virtual 'loopback' that routes the system's sound output back as an input, making it available to recording software.
Method 1: The Built-in Recorder (Microphone Audio Only)
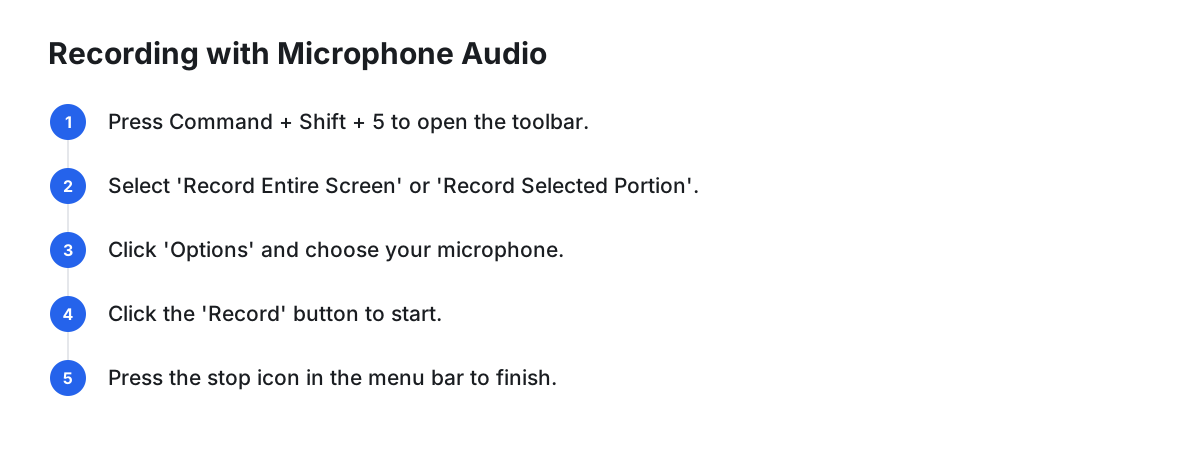
For quick recordings with a voiceover, your Mac’s built-in Screenshot toolbar is the fastest option. It uses QuickTime Player technology behind the scenes and is perfect for narrating your actions on screen.
Here’s how to use it:
- Open the Toolbar: Press the keyboard shortcut
Command + Shift + 5. - Select Recording Mode: In the toolbar that appears, choose either "Record Entire Screen" or "Record Selected Portion".
- Choose Your Audio Source: Click on the "Options" menu. Under the "Microphone" section, select your built-in microphone or any connected external microphone.
- Start Recording: Click the "Record" button.
- Stop Recording: Click the recording icon (a circle with a square inside) in your menu bar, or press
Command + Control + Escape.
This method is fast and simple but has one major limitation: it only captures external sounds. It cannot record the audio coming from your apps.
Method 2: Record Internal Audio with the BlackHole Workaround
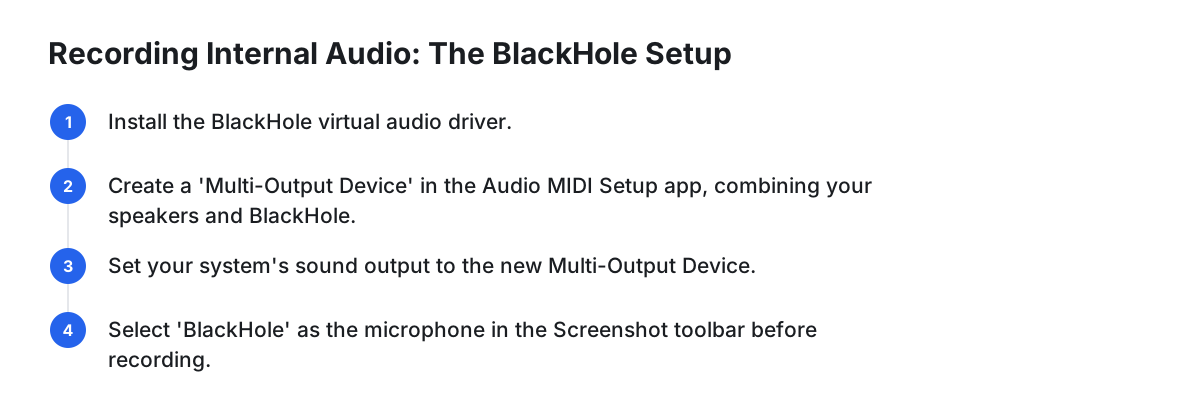
To capture your Mac's internal sounds with the built-in recorder, you need a free, open-source tool called BlackHole. It's a virtual audio driver that routes audio between applications. The setup is technical, but it's a powerful one-time configuration.
Step 1: Install BlackHole
Download and install the BlackHole driver from the developer's official website. For users familiar with package managers, it can also be installed via Homebrew.
Step 2: Create a Multi-Output Device
This is the critical step. A Multi-Output Device lets you hear your Mac's audio through your speakers/headphones while also sending it to the BlackHole virtual input for recording.
- Open the Audio MIDI Setup app (find it in
Applications > Utilities, or search with Spotlight). - Click the + button in the bottom-left corner and select "Create Multi-Output Device".

- In the new device panel, check the boxes for your primary output (e.g., "MacBook Pro Speakers" or your headphones) and "BlackHole 16ch".
- Ensure your primary output (speakers/headphones) is at the top of the list. This device will act as the Master Device.
- Check the "Drift Correction" box for BlackHole 16ch. This prevents the audio from going out of sync during long recordings.

Step 3: Set Your System's Sound Output
Now, tell your Mac to use this new virtual device for all sound output.
- Open System Settings > Sound.
- Under the "Output" tab, select the "Multi-Output Device" you just created.
Step 4: Record Your Screen with Audio
With the setup complete, use the built-in screen recorder:
- Press
Command + Shift + 5to open the Screenshot toolbar. - Click "Options".
- Under the "Microphone" section, select "BlackHole 16ch" as your audio source.
- Click "Record" to capture your screen and the internal sound.
The Easiest Way: Use a Dedicated Screen Recorder App
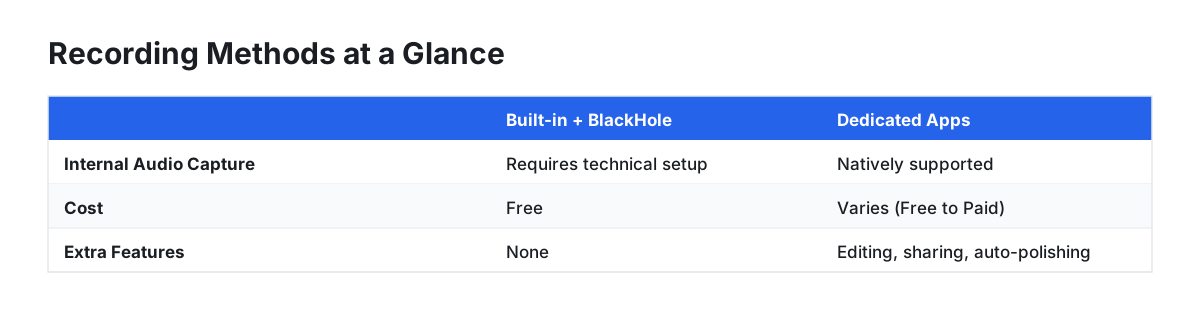
While the BlackHole method works, it's complex. Dedicated apps offer a much smoother experience, often capturing internal audio natively without any setup. They also provide advanced features like editing, sharing, and better export quality. Here’s a comparison of the best options.
| Tool | Records Internal Audio Natively? | Price | Max Resolution/FPS | Key Feature |
|---|---|---|---|---|
| QuickTime + BlackHole | No (Requires workaround) | Free | System Dependent | Built into macOS |
| OBS Studio | Yes (With audio driver install) | Free | User-configurable | Professional streaming/mixing |
| Loom | Yes | Freemium, Paid plans from $12.50/mo | Up to 4K | Fast sharing & team collaboration |
| Cinemak | Yes | Free Recorder, Paid Cloud/AI | Up to 4K / 60fps | Automatic post-production polishing |
1. OBS Studio: The Power User's Choice
OBS (Open Broadcaster Software) Studio is a free, open-source, and incredibly powerful tool for recording and live streaming. It can capture multiple video and audio sources, including your screen, webcam, microphone, and computer audio, and mix them into professional scenes.
- Pros: Completely free, highly customizable, records desktop audio natively (after a one-time audio driver installation), and is the industry standard for live streaming.
- Cons: Has a steep learning curve. The interface is complex and can be overwhelming for beginners who just want a simple recording.
- Best for: Streamers, gamers, and technical users who need full control over their recording setup.
2. Loom: Best for Team Collaboration
Loom is designed for speed and asynchronous team communication. Its main strength is how quickly you can record a video, add annotations, and share it with a link. It captures your screen, camera, and audio with minimal fuss.
- Pros: Extremely easy to use, cloud-based for instant sharing, great for team feedback and bug reports.
- Cons: Primarily a subscription service. The free plan has limitations. Editing features are basic compared to dedicated video editors.
- Best for: Product teams, remote workers, and anyone who needs to quickly share video messages.
3. Cinemak: Best for Automatically Polished Videos
Cinemak focuses on bridging the gap between raw capture and a finished, professional-looking video. Its core value proposition is automating the tedious post-production work. The moment you stop recording, it applies effects that would normally require manual editing.
- Pros: Core recorder is free. Automatic polishing features like auto-zoom on clicks and cursor smoothing create a professional look instantly. It exports in high quality (up to 4K at 60fps). It's a full pipeline from capture to hosting.
- Cons: Advanced features like cloud hosting, analytics, and AI translation are paid add-ons.
- Best for: Founders, marketers, and creators making product demos or tutorials who want a polished result without spending hours in a video editor.
Here’s an example of the automatic polishing Cinemak applies. Notice how the final version zooms in on the action and smooths out the erratic mouse movements.

For those who value speed and a high-quality final product, this automation can be a significant time-saver. Download the free Cinemak recorder to see how it can streamline your workflow.
FAQ
Why can't I screen record with sound on Mac?
By default, macOS blocks applications from recording internal computer audio for privacy and copyright protection. You can easily record your own voice with the built-in microphone, but capturing app sounds requires a virtual audio driver like BlackHole or a dedicated third-party screen recording app.
Can you screen capture with audio?
Yes, you can. For voiceovers, the built-in Screenshot tool (Cmd+Shift+5) lets you select your microphone as an audio source. For recording sound from your apps (like from a video or game), you must use a workaround like the BlackHole audio driver or a specialized recording application like OBS Studio or Cinemak.
How to record screen with audio while wearing headphones on Mac?
To record your Mac's internal sound while using headphones, you must use the "Multi-Output Device" method in the Audio MIDI Setup utility. In the setup, you will select both your headphones and the BlackHole virtual driver as outputs. This sends the audio to your headphones so you can hear it, and to BlackHole so it can be recorded.